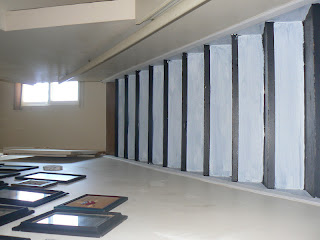
So, we painted them. First try with the paint, we painted them navy blue. We used porch paint and added the little anti-slip granules (think sand!) to keep the treads safe for the kids. I also put wallpaper on their fronts. This was pre-digital photography era and the thought of rummaging though my scrapbooks to find a photo and scan it is making my head hurt. So just imagine it.
Then I got tired of the navy blue and we painted the stairs black.
Pardon the horrible photo. There is a window at the top of the stairs and I'm really quite an amateur with photography, so no matter what I did, I couldn't get rid of the glow up at the landing. You'll note that the walls are a beige-y cream color and there is a lovely patchwork of drywall mud along the sides of the stairs. My littlest boy did that damage.
So, along comes Pinterest. I see stairs, previously ugly stairs, transformed into gorgeousness by a simple sanding and painting. How hard is it to sand and paint? Well, turns out this project is a paint in the BOO-tay. Big ol' pain, actually. It's been going on for several months now.
First, I just painted the face of the steps with white Kilz, just to see how that would look. Hey, even with the crappy paint job, I think it looks GREAT!
The base of our stairs are wacky. This house is a remodeled 1947 cottage...and our remodel was actually the 4th addition put on the house. So here we have new stairs meeting 1947 oak and 2000 vinyl. BUT, the white face looks GOOD! I do have an idea for that bottom step, which might include putting a new tread on it and lengthening it to extend over the wall...and then wrapping the base moulding around the front. But first thing first.
So then, we sanded everything. I do mean we--I sanded, Brad sanded, and Brendan sanded. Turns out Brendan is some sort of freak with the sander. I mean freak in a good way-he ended up with the best technique, so LUCKY BRENDAN got to sand all 17 stairs. (I mean "lucky me, b/c Brendan sanded all 17 stairs.")
Next came the drywall mud to fix all the problems on the stairs. Too many problems to list here, but let's just say that these bad boys were supposed to be covered by carpet, after all! They are warped, cracked, pitted, uneven, and gappy. Yes, gappy is a word. I just made it up.
 |
| If you look closely, you can see the blue peeking through on the tread. You can clearly see the drywall mud that is everywhere. Blech. |
Here's another look at the stairs...this is what you can see pretty much from our front door.
Isn't that awesome?! Work in progress, people, a work in progress.
Here's my original inspiration for the stairs, as found on Pinterest:
ORIGINAL source: Centsational Girl
Even the "before" in the inspiration photo looks better than my before. And better than my "during". Will my "after" prove to have been worth all the work? Stay tuned...


Nooooooooo!!! Where are the bookstairs? You have to do the bookstairs! :D
ReplyDeletei do heart those bookstairs! I'm thinking if we can ever finish these stairs, the basement stairs might get the book treatment!!!!!
DeleteThe photos from Pinterest are from one of my favorite website www.centsationalgirl.com
ReplyDeleteIf you haven't been to her sight before, GO NOW! Her tips are priceless and everything she does is fabulous. I think once you read what she did and used to stain & paint her stairs you will have it done in no time and they will be beautiful!
I've been thinking about doing the same thing to our stairs back home, when we get to live in our house again, but am not sure what kind of wood (real or fake) is under the carpet. Would love to do this though. Good luck!!
I found your site from A Bowl Full of Lemons! :)
Thank you so much for helping me source that photo!!! I hated to post a photo that I couldn't properly credit, and I know SOMEONE would recognize it! Thanks & I'll go check out her site. =)
DeleteDo come back & visit Life With Boys as I fully intend to get these darn stairs finished before mid-April!
Thanks for stopping by!